> ## Documentation Index
> Fetch the complete documentation index at: https://docs.streemlined.io/llms.txt
> Use this file to discover all available pages before exploring further.
# Visual Editor
> Build and manage pipelines with the Streemlined visual editor
The Streemlined visual editor is a drag-and-drop interface for building streaming pipelines. This guide covers all the features you need to master it.
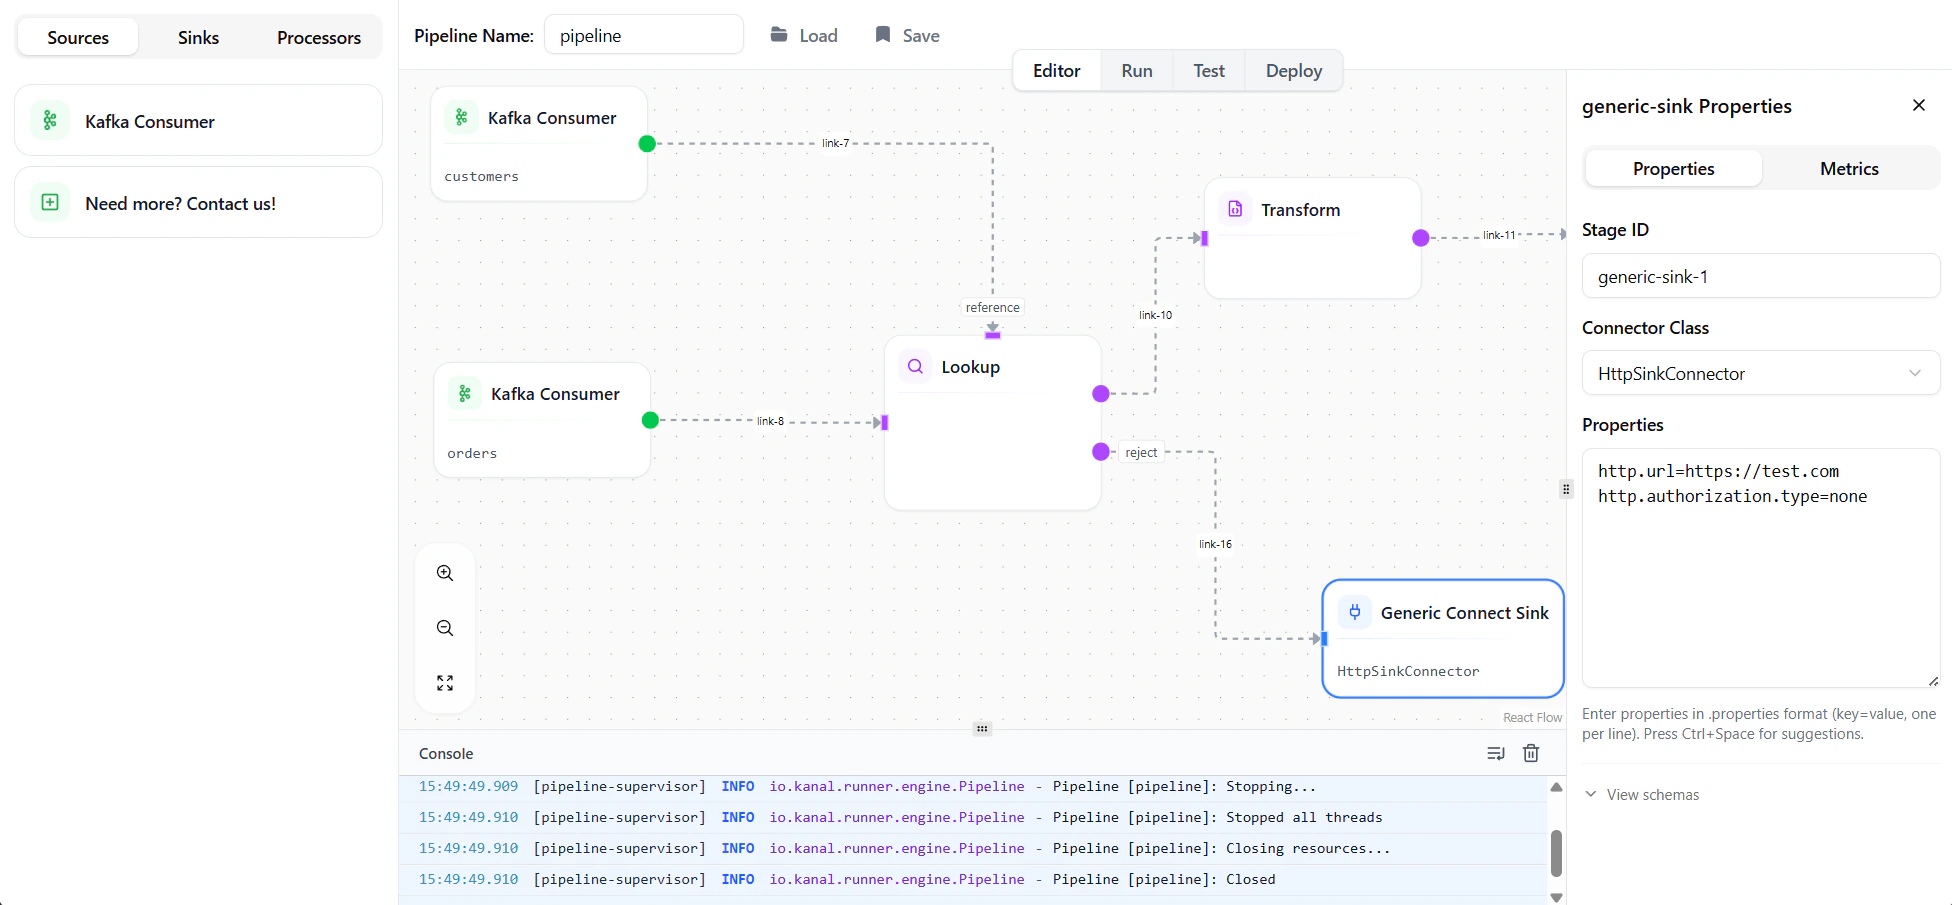 ## Editor Layout
The editor consists of four main areas:
| Area | Description |
| -------------------- | ------------------------------------------------------------------------------------------------------------------------------------------ |
| **Canvas** | The main workspace where you build your pipeline |
| **Node Palette** | Left sidebar with available nodes to drag onto the canvas (tabs include Sources, Processors, Flow, Sinks, and **AI** for the AI assistant) |
| **Properties Panel** | Right sidebar showing configuration for the selected node |
| **Toolbar** | Top bar with actions like run, stop, and save |
| **Console** | Bottom panel displaying log messages (INFO, WARN, ERROR) |
## Working with Nodes
### Adding Nodes
To add a node to your pipeline:
1. Find the node you want (sources, processors, or sinks) on the left panel
2. Drag and drop it to the canvas
### Selecting Nodes
* **Single select** — Click on a node
* **Multi-select** — Hold `Shift` and drag a selection box
### Moving Nodes
* Drag nodes to reposition them on the canvas
* Selected nodes can be moved together
* The canvas auto-pans when you drag near edges
### Deleting Nodes
* Select a node and press `Delete` or `Backspace`
* Selected nodes can be deleted together
Deleting a node also removes all its connections. This action cannot be undone.
## Connecting Nodes
### Creating Links
To connect two nodes:
1. Hover over a node's output port (right side)
2. Click and drag to another node's input port (left side)
3. Release to create the connection
Links automatically snap to compatible ports.
### Removing Links
* Click on a link to select it, then press `Delete`
* Or drag the link endpoint away from its port
## Properties Panel
When you select a node, the properties panel shows its configuration options.
### Common Properties
All nodes share these properties:
| Property | Description |
| ----------- | ----------------------------------------------- |
| **Node ID** | Unique identifier for this node in the pipeline |
| **Label** | Display name shown on the canvas |
### Node-Specific Properties
Each node type has specific configuration options. See the [Nodes Reference](/nodes) for details on each node.
### Schema Viewer
For nodes with schemas, the properties panel shows:
* **Input Schema** — Structure of incoming data
* **Output Schema** — Structure of outgoing data
Click on a schema to expand and view field details.
## Working with Schemas
Streemlined uses a bidirectional schema propagation system that flows schemas through your pipeline based on the role of each node. Schemas can propagate both **downstream** (from sources toward sinks) and **upstream** (from sinks back toward sources).
### How Different Nodes Handle Schemas
| Node Type | Propagation Behavior |
| ----------------------------------------------- | ------------------------------------------------------------------------------------------------------------------------------------------------------------------ |
| **Sources** (Kafka Consumer) | Emit output schema downstream only |
| **Pass-through Processors** (Peek, Branch) | Automatically derive output from input and propagate downstream |
| **Enriching Processors** (Lookup, Explode) | Derive output by combining inputs and configurations |
| **Data Masking** | Derives output schema from the input schema by applying masking rules (for example, `REDACT` / `FAKER` may widen types to string; `NULL` may mark fields optional) |
| **Transform** | Does **not** auto-derive output. Accepts schemas from both directions for manual mapping |
| **Sinks** (JDBC, HTTP, MongoDB, Kafka Producer) | Emit expected schema **upstream**. Refuse incoming schema updates |
### Schema Conflicts
When a schema cannot propagate because a node refuses the update, the connecting link turns **orange** to indicate a conflict.
```mermaid theme={null}
flowchart LR
A[Kafka Consumer] -->|"schema: Order"| B[Branch]
B -->|"🟠 conflict"| C[JDBC Sink]
```
**Common conflict scenarios:**
* Connecting a source directly to a sink with different schemas
* Source output schema doesn't match sink's expected schema
### Resolving Schema Conflicts
When you click on an orange (conflicted) link, the Properties Panel suggests adding a **Transform node** to bridge the schema mismatch:
1. Click the conflicted link
2. Click **"Add a Transform Node"** in the Properties Panel
3. A Transform node is inserted between the source and target
4. The Transform node's input is set to the source schema
5. The Transform node's output is set to the sink's expected schema
6. Configure the mapping in the Transform node to convert between schemas (see [Transformations](/transformations) for JSONata syntax)
```mermaid theme={null}
flowchart LR
A[Kafka Consumer] -->|"schema: Order"| B[Branch] -->|"schema: Order"| T[Transform]
T -->|"schema: TableRow"| C[JDBC Sink]
style T fill:#EDF6F9
```
## Handling Errors
Every domain error in Streemlined has a **dedicated error output**. When a deserialization fails, a Lookup finds no match, or a Sink cannot write, you decide what happens: route the record to a Dead Letter Queue, send it to a recovery flow — or fail the pipeline entirely if the error is unacceptable.
### Error Outputs by Node Type
| Node | Error Output | Triggered When |
| ----------------------- | ---------------------- | ------------------------------------------------------------------- |
| **Kafka Consumer** | Deserialization errors | Record cannot be parsed (malformed JSON, schema mismatch) |
| **Lookup** | Reject output | Reference data is missing for a record |
| **Kafka Connect Sinks** | Sink errors | Connector fails to write (connection issues, constraint violations) |
| **Kafka Producer** | Serialization errors | Record cannot be serialized to target format |
### Configuring Error Handling
To configure error handling for a node:
1. Select the node that can produce errors
2. In the Properties Panel, locate the error output port
3. Connect the error output to another node (e.g., a Kafka Producer for a Dead Letter Queue)
4. Configure the target node to handle error records appropriately
This approach keeps your main pipeline clean while giving you full visibility and control over failures.
## Running Pipelines
### Start a Pipeline
Click the **Play** button in the toolbar to start your pipeline locally.
The pipeline will:
1. Validate all node configurations
2. Connect to Kafka and other external systems
3. Begin processing data
### Deploy to Production
The Play button includes a small arrow that expands to reveal the **Deploy** option. Clicking Deploy opens a dedicated deployment screen where you can:
* Configure environment variables for production
* Set up connection strings and credentials
* Review deployment settings before going live
Use the Deploy screen to properly configure your pipeline for production environments, keeping sensitive values like API keys and passwords separate from your pipeline definition.
### Monitor Execution
While running, you can observe:
* **Throughput** — Records processed per second
* **Latency** — Processing time per record
* **Errors** — Failed records and error messages
### Console
The Console panel at the bottom of the screen displays real-time log messages from your pipeline.
### Stop a Pipeline
Click the **Stop** button to gracefully shut down the pipeline.
Streemlined commits Kafka offsets after successful processing, so stopping and restarting won't cause data loss.
## Saving and Loading
Saving and loading is currently limited to your browser's Local Storage. Pipelines are not synced across devices or browsers, and clearing your browser data will delete saved pipelines.
### Save Pipeline
1. Click **Save** in the toolbar
2. Enter a name for your pipeline, or select an existing one to overwrite
The save screen displays thumbnail previews of your existing pipelines, making it easy to identify which one to overwrite.
### Load Pipeline
1. Click **Load** in the toolbar
2. Browse the visual previews and select the pipeline you want to open
## Next Steps
Learn JSONata for data transformation
Learn about all available nodes
Configure Kafka, databases, and more
## Editor Layout
The editor consists of four main areas:
| Area | Description |
| -------------------- | ------------------------------------------------------------------------------------------------------------------------------------------ |
| **Canvas** | The main workspace where you build your pipeline |
| **Node Palette** | Left sidebar with available nodes to drag onto the canvas (tabs include Sources, Processors, Flow, Sinks, and **AI** for the AI assistant) |
| **Properties Panel** | Right sidebar showing configuration for the selected node |
| **Toolbar** | Top bar with actions like run, stop, and save |
| **Console** | Bottom panel displaying log messages (INFO, WARN, ERROR) |
## Working with Nodes
### Adding Nodes
To add a node to your pipeline:
1. Find the node you want (sources, processors, or sinks) on the left panel
2. Drag and drop it to the canvas
### Selecting Nodes
* **Single select** — Click on a node
* **Multi-select** — Hold `Shift` and drag a selection box
### Moving Nodes
* Drag nodes to reposition them on the canvas
* Selected nodes can be moved together
* The canvas auto-pans when you drag near edges
### Deleting Nodes
* Select a node and press `Delete` or `Backspace`
* Selected nodes can be deleted together
Deleting a node also removes all its connections. This action cannot be undone.
## Connecting Nodes
### Creating Links
To connect two nodes:
1. Hover over a node's output port (right side)
2. Click and drag to another node's input port (left side)
3. Release to create the connection
Links automatically snap to compatible ports.
### Removing Links
* Click on a link to select it, then press `Delete`
* Or drag the link endpoint away from its port
## Properties Panel
When you select a node, the properties panel shows its configuration options.
### Common Properties
All nodes share these properties:
| Property | Description |
| ----------- | ----------------------------------------------- |
| **Node ID** | Unique identifier for this node in the pipeline |
| **Label** | Display name shown on the canvas |
### Node-Specific Properties
Each node type has specific configuration options. See the [Nodes Reference](/nodes) for details on each node.
### Schema Viewer
For nodes with schemas, the properties panel shows:
* **Input Schema** — Structure of incoming data
* **Output Schema** — Structure of outgoing data
Click on a schema to expand and view field details.
## Working with Schemas
Streemlined uses a bidirectional schema propagation system that flows schemas through your pipeline based on the role of each node. Schemas can propagate both **downstream** (from sources toward sinks) and **upstream** (from sinks back toward sources).
### How Different Nodes Handle Schemas
| Node Type | Propagation Behavior |
| ----------------------------------------------- | ------------------------------------------------------------------------------------------------------------------------------------------------------------------ |
| **Sources** (Kafka Consumer) | Emit output schema downstream only |
| **Pass-through Processors** (Peek, Branch) | Automatically derive output from input and propagate downstream |
| **Enriching Processors** (Lookup, Explode) | Derive output by combining inputs and configurations |
| **Data Masking** | Derives output schema from the input schema by applying masking rules (for example, `REDACT` / `FAKER` may widen types to string; `NULL` may mark fields optional) |
| **Transform** | Does **not** auto-derive output. Accepts schemas from both directions for manual mapping |
| **Sinks** (JDBC, HTTP, MongoDB, Kafka Producer) | Emit expected schema **upstream**. Refuse incoming schema updates |
### Schema Conflicts
When a schema cannot propagate because a node refuses the update, the connecting link turns **orange** to indicate a conflict.
```mermaid theme={null}
flowchart LR
A[Kafka Consumer] -->|"schema: Order"| B[Branch]
B -->|"🟠 conflict"| C[JDBC Sink]
```
**Common conflict scenarios:**
* Connecting a source directly to a sink with different schemas
* Source output schema doesn't match sink's expected schema
### Resolving Schema Conflicts
When you click on an orange (conflicted) link, the Properties Panel suggests adding a **Transform node** to bridge the schema mismatch:
1. Click the conflicted link
2. Click **"Add a Transform Node"** in the Properties Panel
3. A Transform node is inserted between the source and target
4. The Transform node's input is set to the source schema
5. The Transform node's output is set to the sink's expected schema
6. Configure the mapping in the Transform node to convert between schemas (see [Transformations](/transformations) for JSONata syntax)
```mermaid theme={null}
flowchart LR
A[Kafka Consumer] -->|"schema: Order"| B[Branch] -->|"schema: Order"| T[Transform]
T -->|"schema: TableRow"| C[JDBC Sink]
style T fill:#EDF6F9
```
## Handling Errors
Every domain error in Streemlined has a **dedicated error output**. When a deserialization fails, a Lookup finds no match, or a Sink cannot write, you decide what happens: route the record to a Dead Letter Queue, send it to a recovery flow — or fail the pipeline entirely if the error is unacceptable.
### Error Outputs by Node Type
| Node | Error Output | Triggered When |
| ----------------------- | ---------------------- | ------------------------------------------------------------------- |
| **Kafka Consumer** | Deserialization errors | Record cannot be parsed (malformed JSON, schema mismatch) |
| **Lookup** | Reject output | Reference data is missing for a record |
| **Kafka Connect Sinks** | Sink errors | Connector fails to write (connection issues, constraint violations) |
| **Kafka Producer** | Serialization errors | Record cannot be serialized to target format |
### Configuring Error Handling
To configure error handling for a node:
1. Select the node that can produce errors
2. In the Properties Panel, locate the error output port
3. Connect the error output to another node (e.g., a Kafka Producer for a Dead Letter Queue)
4. Configure the target node to handle error records appropriately
This approach keeps your main pipeline clean while giving you full visibility and control over failures.
## Running Pipelines
### Start a Pipeline
Click the **Play** button in the toolbar to start your pipeline locally.
The pipeline will:
1. Validate all node configurations
2. Connect to Kafka and other external systems
3. Begin processing data
### Deploy to Production
The Play button includes a small arrow that expands to reveal the **Deploy** option. Clicking Deploy opens a dedicated deployment screen where you can:
* Configure environment variables for production
* Set up connection strings and credentials
* Review deployment settings before going live
Use the Deploy screen to properly configure your pipeline for production environments, keeping sensitive values like API keys and passwords separate from your pipeline definition.
### Monitor Execution
While running, you can observe:
* **Throughput** — Records processed per second
* **Latency** — Processing time per record
* **Errors** — Failed records and error messages
### Console
The Console panel at the bottom of the screen displays real-time log messages from your pipeline.
### Stop a Pipeline
Click the **Stop** button to gracefully shut down the pipeline.
Streemlined commits Kafka offsets after successful processing, so stopping and restarting won't cause data loss.
## Saving and Loading
Saving and loading is currently limited to your browser's Local Storage. Pipelines are not synced across devices or browsers, and clearing your browser data will delete saved pipelines.
### Save Pipeline
1. Click **Save** in the toolbar
2. Enter a name for your pipeline, or select an existing one to overwrite
The save screen displays thumbnail previews of your existing pipelines, making it easy to identify which one to overwrite.
### Load Pipeline
1. Click **Load** in the toolbar
2. Browse the visual previews and select the pipeline you want to open
## Next Steps
Learn JSONata for data transformation
Learn about all available nodes
Configure Kafka, databases, and more